
Crochet security blanket pattern shaped like a tree is a heartwarming project that combines comfort, creativity, and handmade charm into one beautiful keepsake.
A crochet security blanket is much more than a small blanket. It often becomes a treasured companion that provides comfort during naps, bedtime, or travel.
Throughout this guide, you will learn how to create a beautiful Crochet security blanket pattern shaped like a tree step by step. From selecting baby-friendly yarn to assembling the finished design, every stage is explained clearly. The project can easily be customized with different leaf colors, embroidered details, or seasonal variations, allowing you to create a truly one-of-a-kind handmade gift that will be cherished for years.
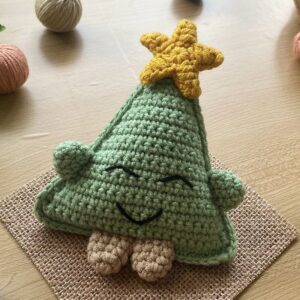
Materials and Preparing Your Crochet Project
Before beginning your Crochet security blanket pattern shaped like a tree, gather all of the materials you need. Preparing everything in advance makes the crochet process smoother and helps maintain consistent tension throughout the project.
Choose a soft baby-safe cotton or cotton-blend yarn that feels gentle against delicate skin. Many crocheters also enjoy using premium anti-pilling acrylic yarn designed specifically for baby items because it is lightweight, durable, and easy to wash.
A 4.0 mm or 4.5 mm crochet hook usually works well with medium-weight yarn, although you should always check your yarn label and make a small gauge swatch before beginning.
Additional supplies include stitch markers, scissors, a yarn needle for weaving in ends, measuring tape, and a small amount of polyester fiberfill if you decide to add a lightly stuffed decorative tree trunk or leaves.
Recommended colors include light green, sage, forest green, brown, cream, and soft beige. These natural shades create a peaceful appearance that fits beautifully in most nurseries while still allowing endless opportunities for personalization.
Before starting the blanket, crochet a small sample square to confirm your gauge. Consistent stitch size helps the finished blanket drape evenly and gives the tree shape a balanced appearance.
Step-by-Step Crochet Stitch Instructions
The main blanket begins at the center using a simple circular or hexagonal construction that gradually expands into a comforting security blanket. The tree appliqué is worked separately and attached after the blanket is complete.
Abbreviations used throughout the pattern include: MR (Magic Ring), ch (chain), sl st (slip stitch), sc (single crochet), hdc (half double crochet), dc (double crochet), inc (increase), and dec (decrease).
Round 1: Make a Magic Ring, ch1, work 12 sc into the ring, and join with a slip stitch. Tighten the ring securely before continuing.
Round 2: Ch2, work 2 dc into every stitch around. Join with a slip stitch. This doubles the stitch count and creates a smooth foundation for the blanket.
Round 3: Ch2, 1 dc, inc, repeat around. Continue increasing evenly in each following round until the blanket reaches approximately 14 to 18 inches in diameter, depending on the desired finished size.
To crochet the tree trunk, chain 16. Work 15 sc across each row for approximately 12 rows or until the trunk reaches the desired height. Fasten off and leave a long tail for sewing.
The leafy canopy is worked separately. Begin with a Magic Ring, crochet 8 sc into the ring, then increase gradually over several rounds. Shape the canopy by alternating increases and even rounds until a rounded treetop is formed. Make several leaf sections if you prefer a fuller appearance.
Attach the tree trunk to the lower center of the blanket using neat whip stitches or mattress stitches. Sew the leafy canopy securely above the trunk and weave in every yarn end carefully.
Assembling and Personalizing the Tree Blanket
Once every crochet piece has been completed, the assembly process transforms the individual parts into a charming Crochet security blanket pattern shaped like a tree. Careful positioning ensures that the finished blanket looks balanced and visually appealing.
Pin the tree trunk temporarily before sewing. This allows you to adjust the placement until it sits perfectly centered on the blanket.
Next, arrange the leafy canopy so it overlaps slightly with the top of the trunk. Sew each section using small invisible stitches that blend naturally with the surrounding crochet fabric.
To add extra texture, crochet tiny leaves, flowers, acorns, or miniature birds and attach them around the canopy. These optional embellishments make every blanket unique without affecting its softness.
Finish the blanket with a decorative border. A simple shell stitch, picot edge, or reverse single crochet edging frames the project beautifully while adding strength around the outer edge.
Finally, inspect every seam carefully. Since this blanket is intended for babies and young children, ensure all decorative pieces are sewn securely and avoid using small detachable components.
Helpful Tips for a Beautiful Finish
Maintaining even crochet tension throughout the blanket helps create a smooth surface and prevents unwanted curling along the edges.
Block the finished blanket gently by lightly dampening it and allowing it to dry flat. Blocking improves stitch definition and enhances the overall appearance of the tree design.
Choose colors that complement the nursery or the season. Soft spring greens create a fresh look, while autumn-inspired shades produce a warm and cozy design.
If the blanket will be used daily, select machine-washable yarn designed for baby items. Easy-care materials make cleaning much more convenient for busy families.
Consider embroidering the baby’s initials or birth date on the tree trunk using matching embroidery thread. Personalized details turn the blanket into a treasured keepsake.
Once you become familiar with the pattern, experiment with larger or smaller blanket sizes, textured stitches, or additional woodland-themed appliqués to create your own signature version of this delightful crochet project.
FAQ
Is this Crochet security blanket pattern shaped like a tree suitable for beginners?
Yes. Anyone comfortable with basic crochet stitches such as chain, single crochet, and double crochet can complete this project by working carefully through each section.
Which yarn is best for this project?
Soft baby-safe cotton or premium anti-pilling acrylic yarn is recommended because it is gentle, durable, and easy to maintain.
How large should the finished blanket be?
Most security blankets measure between 14 and 18 inches, although you can easily continue increasing rounds to create a larger version.
Can I wash the finished blanket?
Yes. Follow the care instructions provided on the yarn label. Most baby-friendly yarns can be machine washed using a gentle cycle and laid flat to dry.
Can I customize the tree design?
Absolutely. You can change the leaf colors, add embroidered flowers, create seasonal themes, or personalize the blanket with initials or special details.
Is this project suitable as a handmade gift?
Definitely. A handmade Crochet security blanket pattern shaped like a tree makes a thoughtful gift for baby showers, birthdays, newborn celebrations, holidays, and nursery decorating.
Conclusion
Creating a Crochet security blanket pattern shaped like a tree is a rewarding crochet project that beautifully combines comfort, creativity, and thoughtful craftsmanship.
Throughout this tutorial, you learned how to choose appropriate materials, work the essential crochet stitches, construct the blanket, crochet the tree trunk and leafy canopy, assemble each section, add decorative finishing touches, and care for the completed project.
The result is a soft and comforting handmade blanket that can become a cherished companion for a child while also serving as a beautiful keepsake for years to come. Whether you make one for your own family or as a heartfelt gift, this project celebrates the joy of handmade creations. If you enjoyed this tutorial, please leave your honest opinion and share your suggestions. Your feedback is always appreciated and helps inspire new crochet ideas and future patterns.